

The Wavlink WiFi extender is a small networking device that you can connect with your home router wirelessly. There are several methods of connection which we will provide here. You can choose any to make your home network strong and reliable.
Mainly we help you to set the extender via: WPS (WiFi protected setup), Computer (ap.setup or 192.168.10.1), and phone (Wavlink app).
Not just the setup, you will find the troubleshooting tips and solutions to fix the Wavlink WiFi extender setup errors. Now, let’s dive in.
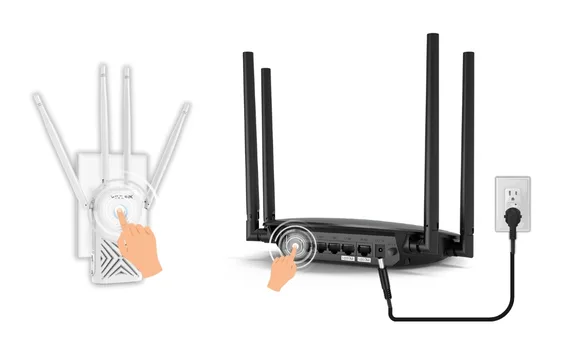
WPS (WiFi protected setup) is a method of connection that connects the extender with the routers. This technology used in the extender mostly, but old routers doesn’t support it. So, if you are linking the extender with the router make sure your router supports the WPS. To set your extender, you need to follow these simple to apply the steps:
Now, you can connect with the extended network through the router’s WiFi SSID password. Well, there are more other methods to complete your Wavlink extender setup, let’s dive into the instructions one by one:
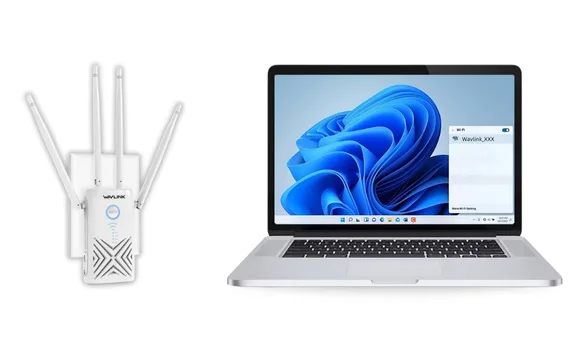
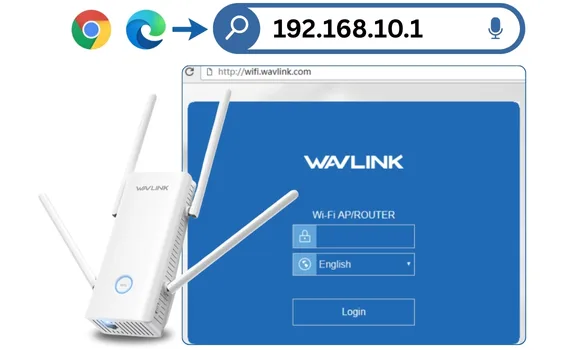
There are two ways that you can use to set your extender up through the computer or laptop. One is using the web URL address ap.setup or two is using the IP address 192.168.10.1. follow these steps to finish the Wavlink extender setup:
Now, link the extender with the router, create the extended network and finish the setup. Then you can use the Wavlink internet services within your internet devices.
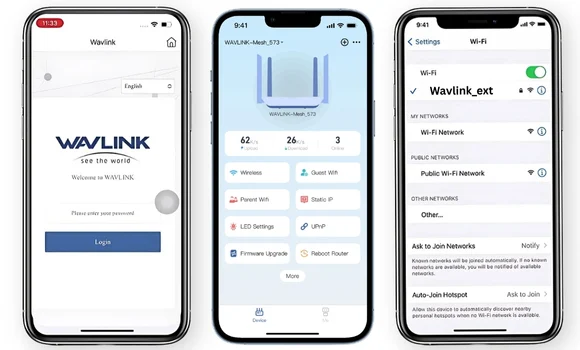
There is one more way to complete the Wavlink extender setup, which is through phone using the Wavlink app.
You can download the Wavlink app from the Play Store, App Store and the official website of Wavlink. After downloading the app from one of the platforms follow these steps:
You can also change the WiFi password and the change channels of the extender within minutes.
Access the Wavlink range extender setup page on your computer/laptop. Then, open the administration tab and select the admin option. Here, you can add new login admin password and SAVE it to apply.
Make sure you are using the up-to-date web browser for the setup. To update, go into the web browser settings > select About > click the Check For Update or UPDATE button.
It will refresh all settings of the extender and wipe out all bugs/glitches from the device. You can restart the device by pressing the Power button on the extender twice.
Find the pinhole reset button on the side of the repeater. Now, use a pin or pen to press and hold it for 10 seconds. The reset process will end within a few minutes, and then you can re-configure the device through the Wavlink WiFi extender setup page on your computer.
How to Separate the Extender Network than Router?
The Wavlink extender network can be a separate network than the router. The router network will look like Wavlink_XXX and when its extended means the extender connected it will look like WavlinkEXT_XXX or Wavlink_EXT. So, to make it separate, you need to access the interface, go to wireless settings and create a new network.
How to Create the Extender Network During Setup?
Yes, when you reached at the create SSID for extender page, you will ask to choose the same router’s SSID or create a new one. So, you should choose Create a New extended network option. Then, just enter the username and password, SAVE and finish the setup.
Where to Plug My Wavlink Extender in Two Floor Home?
So, if your house is of two floors and you want to extend the router’s range to the second floor, you should connect the extender inside the reach of the router. Plug the extender on the stairs if possible or nearby them.
How to Log into the Extender via Wavlink App?
Use the Wavlink Extender login credentials or create a new Wavlink ID with the help of the your Email address.